API Reference: Coinbase using OAuth2 (Node.js)
This guide covers interacting with the Coinbase API on behalf of other Coinbase users.

If you’re looking to access Coinbase API for only your own account, head to the Coinbase using API Key guide here.
Postman Request Collection: https://www.postman.com/saasbase/workspace/coinbase-oauth2/collection/594120-a9c46ba3-d3c6-4e8d-891c-a81a7828534b
Complete Source Code: https://gist.github.com/bdcorps/0e07d12118b768e6ba9976a7dcb74936
Getting Started
- Create a new Coinbase account.
- Head to the API section in the Settings and create a new OAuth2 application.

3. Add a Redirect URI as *YOUR_SERVER_ADDRESS*/callback. Mine is http://localhost:3006/callback because that is the port number I will be running my Express server on.
4. After successfully creating the app, you will be presented with your CLIENT_ID and CLIENT_SECRET. Keep them handy.
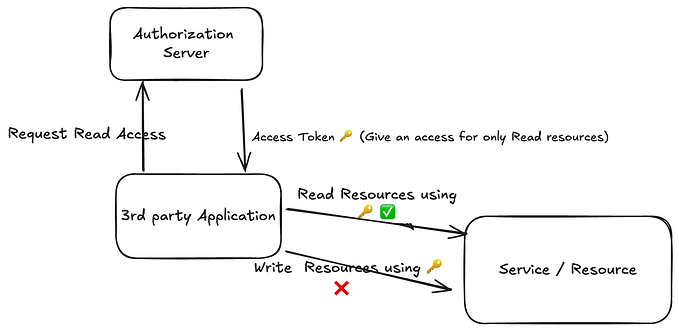
Authentication Flow
- Users clicks on a Connect to Coinbase button and is redirected to their Coinbase wallet to be authenticated.
- Once the user successfully logs in, they are redirected to the REDIRECT_URL specified in the OAuth2 App Settings. In my case, it will be
https://localhost:3006/callback - The request to
/callbackwill contain acodewhich is a temporary authorization code that can be traded for a Access Token/Refresh Token pair. - We make a
POSTto https://api.coinbase.com/oauth/token with thecodeto get back our Access and Refresh tokens. - From now on, every request will include an Authorization Header with the Access Token attached.
Authenticate a user with their Coinbase Credentials
Create a index.html with a button to redirect the user:
<!DOCTYPE html>
<html lang="en">
  <head> </head>
  <body>
    <!-- Replace credentials in the URL with your App Credentials. Full permissions list at: <https://developers.coinbase.com/docs/wallet/permissions> -->
    <a
      href="<https://www.coinbase.com/oauth/authorize?response_type=code&client_id=4a50e127e46bde8b325ab704b7cd119e8f0626445ccdf84672096a3392baaee4&redirect_uri=http://localhost:3006/callback&state=SECURE_KEY&scope=wallet:user:read,wallet:user:email,wallet:accounts:read,wallet:transactions:read,wallet:transactions:send&meta[send_limit_amount]=1&meta[send_limit_currency]=USD&meta[send_limit_period]=day>"
      >Connect with Coinbase</a
    >
  </body>
</html>
On our express server, we set up the /callback endpoint:
app.get("/callback", async (req, res) => {
  const { code, state } = req.query;
  if (state === SECRET) {
    const data = qs.stringify({
      'grant_type': 'authorization_code',
      'code': code,
      'client_id': CLIENT_ID,
      'client_secret': CLIENT_SECRET,
      'redirect_uri': REDIRECT_URI
    });
    const config = {
      method: 'post',
      url: '<https://api.coinbase.com/oauth/token>',
      headers: {
        'Content-Type': 'application/x-www-form-urlencoded'
      },
      data
    };

    try {
      const response = await axios(config);

      // saving tokens for other requests
      accessToken = response.data.access_token;
      refreshToken = response.data.refresh_token;

      res.send({ response: response?.data });
    } catch (e) {
      console.log("Could not trade code for tokens", e.response.data)
    }
  }
});
Get User Details
Returns details on the logged in user. If you’re looking for details of a different user, use the https://api.coinbase.com/v2/users/:user_id endpoint.
// Gets the user details
app.get("/user", async (req, res) => {
  const config = {
    method: 'get',
    url: '<https://api.coinbase.com/v2/user>',
    headers: {
      'Authorization': `Bearer ${accessToken}`
    }
  };

  try {
    const response = await axios(config);
    res.send({ response: response?.data })
  } catch (e) {
    console.log("Could not get user", e.response.data)
  }
});
Get Primary Account for a currency
Returns the primary account for a given currency.
// Gets the primary account for BTC
app.get("/account", async (req, res) => {
  const config = {
    method: 'get',
    url: '<https://api.coinbase.com/v2/accounts/BTC>',
    headers: {
      'Authorization': `Bearer ${accessToken}`
    }
  };

  try {
    const response = await axios(config);
    res.send({ response: response?.data })
  } catch (e) {
    console.log("Could not get accounts", e.response.data)
  }
});
Send money from Coinbase Account to External Crypto Address
Sends crypto from a Coinbase Account to an outside address. Make sure:
- Have access to the
wallet:transactions:sendscope. This is specified in the initial request to Coinbase OAuth. - The account should have balance to transfer from.
// Sends money from Coinbase account to any address
app.get("/sendMoney", async (req, res) => {
  const CB_ACCT_TO_SEND_FROM = "" // get this by querying the /account endpoint
  const ADDRESS_TO_SEND_TO = ""

  const data = JSON.stringify({
    "type": "send",
    "to": ADDRESS_TO_SEND_TO,
    "amount": "0.1",
    "currency": "BTC"
  });

  const config = {
    method: 'post',
    url: `https://api.coinbase.com/v2/accounts/${CB_ACCT_TO_SEND_FROM}/transactions`,
    headers: {
      'Content-Type': 'application/json',
      'Authorization': `Bearer ${accessToken}`,
    },
    data
  };

  try {
    const response = await axios(config);
    res.send({ response: response?.data })
  } catch (e) {
    console.log("Could not send money", e.response.data)
  }
});
Refresh an expired Access Token
A Coinbase Access Token lasts 2 hours. The token has to be refreshed by making a request to the https://api.coinbase.com/oauth/token endpoint with the Refresh Token. A Refresh Token can be traded for a new Access Token/Refresh Token pair only once.
app.get('/refreshToken', async (req, res) => {
  const data = qs.stringify({
    'grant_type': 'refresh_token',
    'client_id': CLIENT_ID,
    'client_secret': CLIENT_SECRET,
    'refresh_token': refreshToken
  });
  const config = {
    method: 'post',
    url: 'https://api.coinbase.com/oauth/token',
    headers: {
      'Content-Type': 'application/x-www-form-urlencoded'
    },
    data
  };

  try {
    const response = await axios(config);
    res.send({ response: response?.data })
  } catch (e) {
    console.log("Could not refresh token", e.response.data)
  }
})
Revoke Token
app.get('/refreshToken', async (req, res) => {
  const data = qs.stringify({
    'token': 'ACCESS_TOKEN'
  });
  const config = {
    method: 'post',
    url: 'https://api.coinbase.com/oauth/revoke',
    headers: {
      'Content-Type': 'application/x-www-form-urlencoded',
      'Authorization': 'Bearer ACCESS_TOKEN'
    },
    data
  };

  try {
    const response = await axios(config);
    res.send({ response: response?.data })
  } catch (e) {
    console.log("Could not refresh token", e.response.data)
  }
})Originally published at https://saasbase.dev on November 14, 2021.